Written by Ramón Saquete
Índice
- How to manage DNS registration in a migration:
- What is a domain?
- What should I take into account when purchasing a domain name?
- How to renew the domain?
- How to transfer a domain to another provider?
- How does it work and what is a DNS server?
- How do I configure the domain to resolve the IP of the web server?
- How is the DNS cache configured?
- How should you manage the DNS registration of your domain during a migration?
How to manage DNS registration in a migration:
- Check that your website is working properly on the new hosting.
- Check the website on the new hosting by putting the domain in the browser.
- Have your domain resolve to the new IP once you have verified that the website is working properly.
- Modify, if necessary, the primary and secondary DNS servers.
- Disable the website on the old hosting during migration on websites where visitor information is stored.
- Transfer the domain to a different provider if necessary.
However, if you want to know in detail the whole process, we recommend you to read on.
Earlier we talked about how to choose our domain name, but… do you know what it is and how it works? do you know the best way to hire it? what should be taken into account when migrating to another hosting? what is the best way to do it? what is a DNS server? how is it managed? If you read on you will discover the answers.
What is a domain?
Websites and services on the Internet are hosted on computers and these have IP addresses which are like telephone numbers that identify them. As it would be very complicated to remember these numbers to access a web page, domains are used, which are easy to remember names that are transformed internally into IP addresses in a transparent way to the user. That way we can type https://www.humanlevel.com/en to access this site, instead of a string of numbers.
What should I take into account when purchasing a domain name?
Normally, hosting providers sell you the domain and web hosting in a package. But it is not necessary to contract both services with the same provider. In fact, I recommend having both services separately, so that you can change a domain or hosting provider independently when necessary.
Try to choose a company that transmits a minimum of confidence and seek opinions beforehand. You don’t want to wake up one day to discover that you’ve lost your domain and in some cases, by extension, your business.
When registering a domain name, we can usually choose how long we are going to keep it before the next renewal. Obviously, we will have to pay more if the contracted time is longer. This time can vary between 1 and 10 years and then it will be publicly visible, so Google will rank it better the longer the time.
We also have to enter the contact information for three people (may be the same): administrative contact (person in charge of management), technical contact (the person to contact for technical problems and who is usually from the contracted hosting) and billing contact (person to be contacted in case the provider has problems with the domain name collection). The most important thing is the email address of the administrative contact, which is the one we will need in case we want to transfer the domain to another provider. Unfortunately, it is quite common to find development companies that contract the domains to the client but put them in their name, instead of putting them in the client’s name. This is an illegal practice, and if they have done it with your domain ask them to put you as administrative contact in order to transfer the domain to you, because if this company closes you can lose your domain and, in addition, it must be the owner of the domain who must be able to manage it.
Since the contact details are public for everyone, including address and telephone numbers, there are users who prefer to keep this data private, in which case, what they should do is to hire a service called private WHOIS, which of course, has an additional cost. In case you are wondering, WHOIS is a protocol used to look up the contact details of a domain name from any computer or online tool. For Google it is better to keep this data public, because it will understand that it is data from a company that has nothing to hide.
Once the domain is registered, it will take some time, usually no more than 24 hours, to become active.
How to renew the domain?
Your registration provider will probably renew it automatically. If the automatic renewal fails, there is a grace period, usually 30 days, during which you can renew the domain at no additional cost and your provider will notify you to do so. After that time, there is a penalty period where the domain can be renewed at an additional cost. The domain would then become pending deletion and finally the domain would be available again for any other user to purchase. So it is quite difficult to lose a domain. In fact, it may be more difficult to ask to unsubscribe.
How to transfer a domain to another provider?
Domains always come by default with the transfer blocked. So first you have to unlock the domain from your administration panel and ask for the Auth Code, which is a code used to authorize the transfer. The way to obtain it depends on each provider and for .es domains it does not exist.
The next step is to request the transfer at the new provider who will ask you for the Auth Code. Finally an email will be sent to the administrative contact with a link to authorize the transfer. Once authorized, the domain should not take long to be transferred.
How does it work and what is a DNS server?
The most complex and technical part of domain management is the management of the DNS (Domain Name Server). This is the service that is responsible for translating domain names to IPs, a process called domain name resolution. If you are not interested in understanding it in depth, you can skip down to How do you configure the domain to resolve the web server’s IP, but if you have a brain hungry for information, read on:

For a better understanding of the name resolution process, let’s look at an example. Suppose we want to resolve or obtain the IP of the domain: www.humanlevel.com:
First our equipment will search in its DNS cache and if it does not find an answer it will launch a request to the DNS server that we have in our IP configuration (for example 8.8.8.8.8). This in turn will look in its cache, if it does not have the answer it can launch another request to another DNS server to resolve it for it. (recursive resolution) or, instead, it will perform what is known as a iterative resolution. Graphically, the order of requests and responses (marked in red) would look like this:
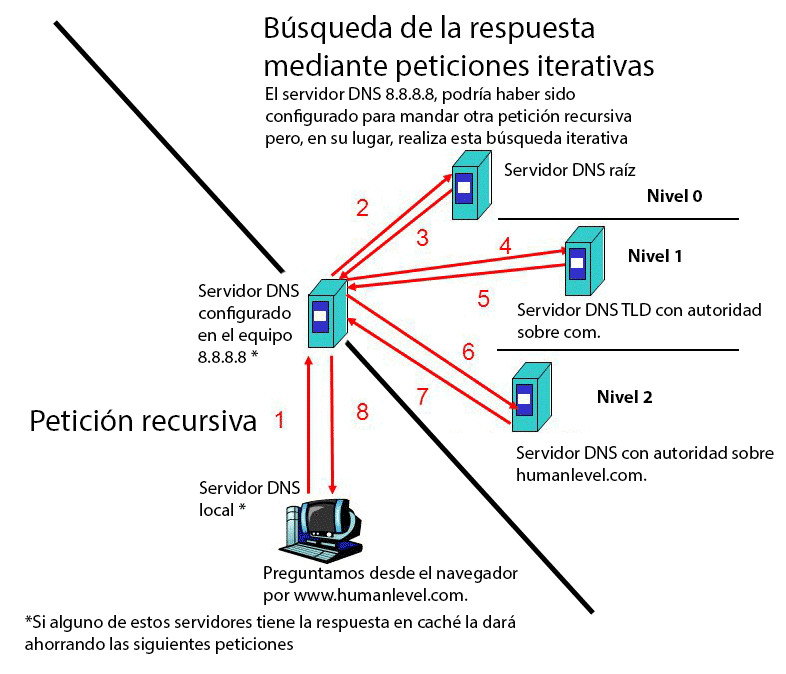
In the image above, to the right of the dividing bar, we have the requests performed by the iterative resolution, which I describe in detail a little later.
In the following image we have the www.humanlevel.com iterative resolution process and console.develpers.google.com, where we can clearly see what is being asked in each level (I have added more levels than those shown in the previous image to better understand how it works):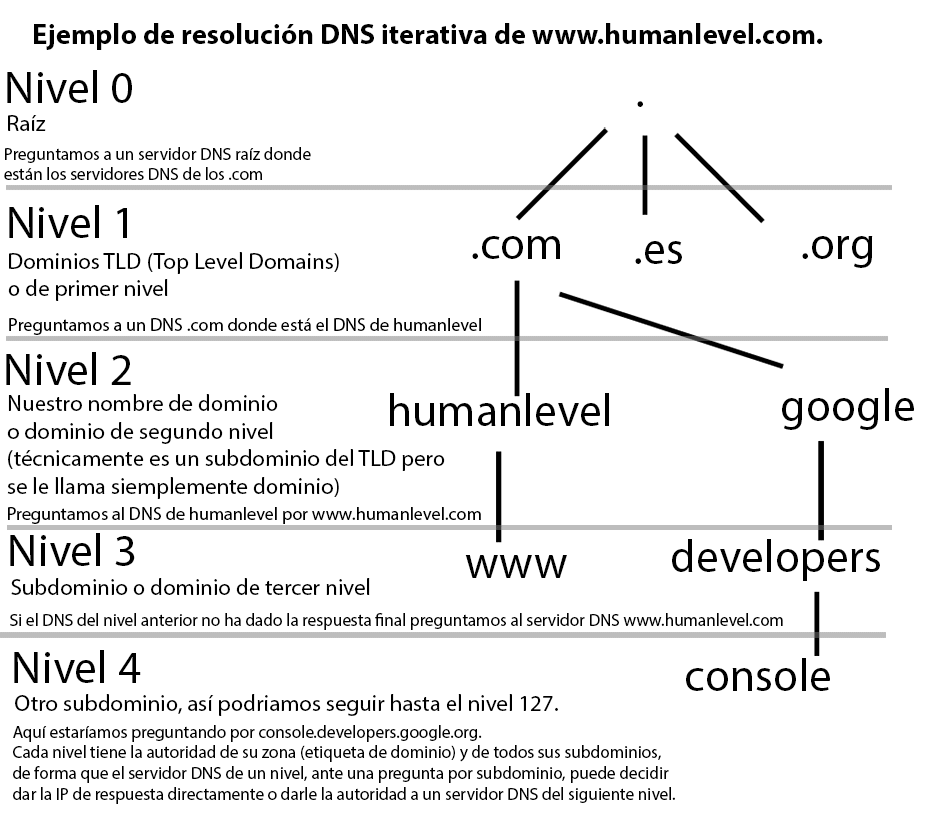
As can be seen, at each level we ask for the servers of the next level. To better understand these two graphs, let’s look at what happens in more detail in the DNS server that performs the iterative resolution:
Initialization: we obtain the DNS servers at level 0 (root servers).
. -> All domains have a dot at the end that represents the root of the domain, you do not need to type it in the browser because it is added internally. So the first thing the DNS server does is to ask what are the root DNS servers? It immediately answers itself by looking at the list in a file called “root zone file” which returns as a result the list of the 13 DNS root servers:NS a.root-servers.net.
NS b.root-servers.net.
NS c.root-servers.net.
NS d.root-servers.net.
NS e.root-servers.net.
NS f.root-servers.net.
NS g.root-servers.net.
NS h.root-servers.net.
NS i.root-servers.net.
NS j.root-servers.net.
NS k.root-servers.net.
NS l.root-servers.net.
NS m.root-servers.net.
As you can see, the answers are of type“NS” (Name Server) which indicates the name servers we have to ask at the next level.
These servers are managed by public and private entities, mostly in the United States. Some, internally, are not a single server, but an entire network of servers distributed around the world. So if you were planning to take down the Internet with a simultaneous terrorist attack on all 13 DNS root servers, you know that this is not an entirely viable option.
Level 0: we obtain the DNS servers of level 1 (TLD servers – Top Level Domain).
com. -> The next step is to go down to the next “.” of the domain and ask one of the root servers where the DNS server of the top level domain “.com” is located (as you may have already guessed, it is the top level because it is the first “.” after the root). As already explained in this blog, there are many types of top-level domains.
This is the list of DNS servers returned by the root server:
NS d.gtld-servers.net.
NS j.gtld-servers.net.
NS k.gtld-servers.net.
NS m.gtld-servers.net.
NS l.gtld-servers.net.
NS f.gtld-servers.net.
NS e.gtld-servers.net.
NS g.gtld-servers.net.
NS h.gtld-servers.net.
NS a.gtld-servers.net.
NS c.gtld-servers.net.
NS b.gtld-servers.net.
NS i.gtld-servers.net.
 The DNS servers for .com are owned by VeriSign, which in turn owns the domain registrar Network Solutions. These gentlemen are the ultimate beneficiaries of the sale and resale of .com and .net domains. This is where the money comes from to maintain these servers and the root servers (VeriSign owns two of them). Note, that Network Solutions is the most important domain provider does not mean that it is the cheapest, nor the one that offers the best service, on the contrary, with the resellers we will have better prices.
ICANN (Internet Corporation for Assigned Numbers and Names) is a non-profit organization in the United States that is responsible for assigning IPs and controlling the management of the DNS system. This organization prevents root servers from inventing their own top-level domain extensions or the entities that manage the root servers from engaging in illegal practices such as, for example, when in 2003, VeriSign redirected all unregistered .com domains to a website of theirs and ICANN had to take them to court to remove the redirection.
Level 1: we obtain level 2 DNS servers (second level domain server).
humanlevel.com. -> In the next level we will ask one of the .com top level domain servers, obtained in the previous step, on which DNS server humanlevel.com is located. This question must be answered with the primary, secondary, etc. DNS server configuration that we have established in the DNS configuration of our domain’s administration panel.
NS ns1.servidordns.com
NS ns2.servidordns.com
These DNS servers always come free of charge when contracting any domain or hosting. So we can use either the DNS server provided by the domain registrar or the DNS server provided by the hosting company. The change of this information can take a few minutes if it is a .com or up to 5 hours if it is a .es, since .es domains update their top level DNS servers every 5 hours. Something that we must take into account in hosting migrations.
Level 2: we obtain the final answer or a level 3 DNS server.
www.humanlevel.com. -> now asks for the subdomain www, to one of the DNS servers of our domain (if there is no subdomain it would ask directly for humanlevel.com). This server may respond with another NS entry for www.humanlevel.com, which would force another DNS server to ask for it, or, on the contrary, it may already give us the final answer with a DNS record entry of type “A”:
www.humanlevel.com A 82.223.131.156
Finally we have the IP returned to the user who put www.humanlevel.com in the browser URL, which is 82.223.131.156 (an IPv4 is always 4 blocks of numbers separated by “.” no larger than 255). If the server is also running IPv6 it should return a DNS record entry of type “AAA” with the IP number as eight groups of hexadecimal digit frames.
With this tiered structuring, each DNS server is said to have the zone authority for the domain that corresponds to it. In the example, ns1.servidordns.com is the DNS server that has authority over the humanlevel.com zone and all the subdomains that hang below it.
How do I configure the domain to resolve the IP of the web server?
To achieve the name resolution of the previous point (www.humanlevel.com by 82.223.131.156), we have done two things:
- Set the IP of the web server that you want to resolve the domain as an “A” entry, in the DNS records of ns1.servidoresdns.com and ns2.servidoresdns.com, which we can configure through the panel where these servers are, either from the domain, hosting or an external DNS service such as Amazon Route 53. The important thing here is not to make mistakes and to configure the name servers that we are going to use.
The IP of the web server will have been previously obtained from our hosting provider and, if we are using the DNS servers of the same one, surely we will already have it configured and it will not be necessary to modify anything. - Configure from the domain panel the primary and secondary DNS servers, ns1.servidoresdns.com and ns2.servidoresdns.comThis information has been copied to the .com DNS servers, making ns1.servidoresdns.com and ns2.servidoresdns.com the servers with authority over humanlevel.com.
Normally, to configure the DNS servers you have to enter the domain name and sometimes also its IP. This information will have been previously obtained from the hosting provider (if we are using the hosting DNS servers) or, on the contrary, from the domain provider (if we are using their DNS servers).
Usually, when registering the domain, it is configured by default with the DNS servers of the provider with which we have registered it.
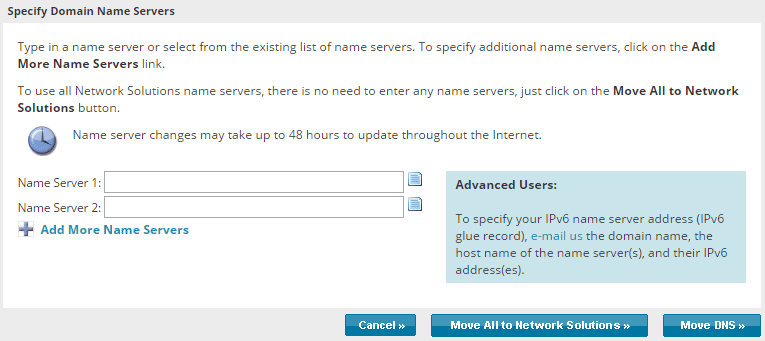
Let’s look at an example:
DNS server configuration panel of a domain name The above image corresponds to the DNS configuration panel of the domain provider Network Solutions. As we can see we have two possibilities to configure the primary and secondary DNS, either adding the ones we want in their corresponding box, or assigning them automatically with the “Move All to Network Solutions” button, which will assign them automatically. The latter option is available in most domain provider panels. To apply the configuration of this example, we would put ns1.servidoresdns.com in “Name Server 1” and ns2.servidoresdns.com in “Name Server 2” and click on “Move DNS”.
As you can see, the configuration we are going to use depends on the situation and only if we understand what we are doing, we will know how to do it without making a mistake. In the following image I illustrate how to proceed in a specific case, to make it clearer: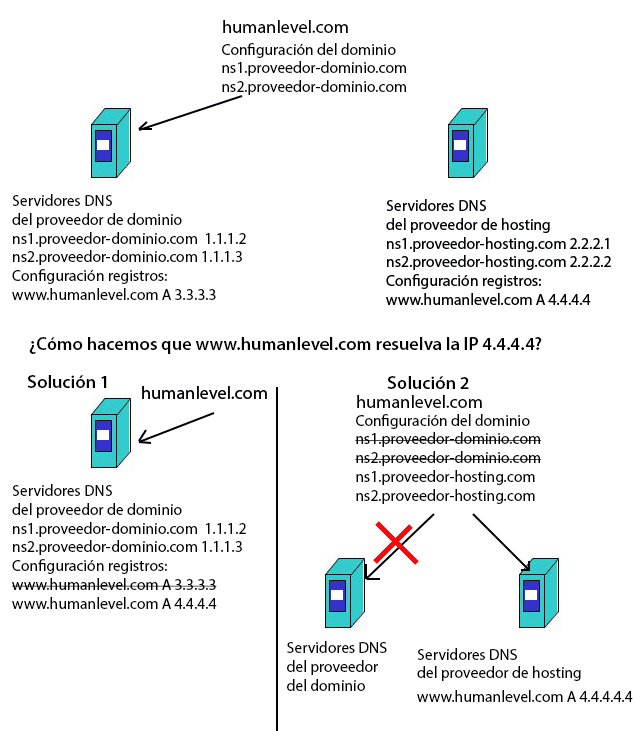
Additionally we will have to put another A entry for humanlevel.com or, instead, we can use the CNAME record to say that the subdomain www.humanlevel.com has the same IP as humanlevel.com, like this:
humanlevel.com A 4.4.4.4
www.humanlevel.com CNAME humanlevel.com
How is the DNS cache configured?
Since the process of performing an iterative resolution requires a lot of requests over the network, in order to optimize time, some DNS servers also launch recursive queries that are cached. For example, when asking for www.humanlevel.com the computer will first look up the IP in your operating system’s DNS cache. If it does not get it, it will launch a recursive request against the DNS server you have configured, which will look in its own cache, and if it does not find it either, it could ask again recursively to another DNS server, until one answers iteratively or recursively the request. The length of time each DNS record entry is cached depends on the Time to Live (TTL) value configured in the SOA (Start Of Authority) record of the DNS server that has authority for the zone.
For example, let’s imagine that we have a TTL of 24 hours. This means that if we change the IP that resolves the domain, during this time, our domain will be able to resolve both the old and the new IP because some DNS servers will have it cached and others will not. To solve this we can change the configuration of the SOA register, changing the TTL so that it takes only 600 seconds (10 minutes). Once this is done, we will wait 24 hours for all caches to be updated and take into account the new TTL.
How should you manage the DNS registration of your domain during a migration?
Finally, let’s take a look at the steps you need to perform on the DNS record when you are migrating a domain:
Check that your web site works correctly on the new hosting. To do this we will add the IP of the new hosting, together with the domain, in the configuration file “hosts” of your computer (its location will depend on the operating system you are working with). This will make your computer resolve the domain with the IP you have configured in this file instead of launching a DNS request.
Check the web in the new hosting by putting the domain in the browser, although first we may have to clear the DNS cache of the browser (in Google Chrome it is done by entering chrome://net-internals/#dns) and the DNS cache of the operating system. The “hosts” file is a remnant of how domain names were resolved before the invention of the hierarchical DNS system, but it has been kept because it is very useful for spoofing requests.
Have your domain resolve to the new IP, once you have verified that the website is working properly. If the administration panel of your DNS server allows you to modify the SOA record lifetime (in some cases it is not possible but we can try to ask our hosting provider), do it in advance of the migration. That is, if you had set a TTL of 24 hours, change it to 10 minutes and wait a whole day for the caches to be cleared, to change the A entry for web hosting. This method is not 100% reliable, as the time-to-live is ignored by some DNS servers, but in most cases it will perform the migration faster.
Modify, if necessary, the primary and secondary DNS servers (making sure that we have the same configuration in the new DNS server), once the change is propagated.
Disable the website on the old hosting during migration on websites where visitor information is stored.The DNS server will be able to store the IP address, such as registrations, purchases, etc. so that during those 10 minutes, users who have the old IP cached in their DNS server, do not make requests that will be lost in a database of a hosting that will disappear.
We can make the change directly and see how it propagates little by little with an online tool like this one: https://www.whatsmydns.net/, if we are not concerned about the propagation time of the caches or we cannot modify the SOA registry.
Transfer the domain to another provider if necessary, but always making sure first that the new provider will have the primary and secondary DNS server configuration that it must have.
Finally, keep in mind also the SEO aspects of a migration, but that has already been discussed in the post how to perform a successful migration and how to track a migration and here we have only seen aspects related to the domain.
This way, we will be able to change our hosting domain without losing emails, transfer our domain to another provider or change our email provider with minimal problems.
In short, basically, this is what we need to know to change the domain successfully, since the complete explanation would take a book or two and I think that, with this explanation, you will have had more than enough.