Written by Ramón Saquete
Index
If we want a profitable Web, it is essential to have a good performance. To give you an idea, when Amazon reduces the loading time by 100 milliseconds, their revenue increases by 1%, which means significant sums of money for them.
There are many factors that can be optimized to achieve shorter load times, but the two most important are the database and the images. In this post I’m going to talk about image optimization for content editors, designers and SEOs. There are also other techniques that can be applied by developers, typesetters and system administrators, but these will not be discussed here.
Images typically account for 70 to 90% of the information the browser needs to download to display a page. It is vital for the Web that content editors know how to reduce the space taken up by images without any perceived difference in quality. Also keep in mind that the imagesThe loading time will also worsen, serve to attract attentiontherefore have good photographs in an online store or any other type of Web, which load fast and look goodis one of the things that we can do to try to increase revenues of our website.
But before we get into the subject, let’s look at some basic concepts:
Basic concepts
- Difference between lossless and lossy compression: When we compress an image by losing quality in the process, we are using lossy compression. If, on the other hand, the compressed image remains identical to the original, we are using lossless compression.
- Raw format: In a computer, a raw format image is one that has no compression and contains the information as the computer needs it to display it on the screen. In photography, the raw format is different, since the image is saved as it is captured by the sensor (although it is not usually completely raw, since cameras usually apply lossless compression).
- Pixel: The images displayed by the computer on the screen are composed of a grid of dots called pixels, each pixel has a numerical value associated with it that indicates what color the monitor should represent.
- Color depth or number of bits: If we consider the width and height of the image as the X and Y axes of representation, the color would be the Z (the depth) since the color is just another numerical value. If we say that the pixels of an image can represent 8-bit colors, this means that each pixel can have any value between 0 and 255, since 256 is the number of different colors we can represent with 8 bits (28=256).
The color depth normally used by any monitor is 24 bits and, therefore, this is the maximum that image formats usually have. - Image size: The greater the number of bits and the size of the image, the more space it will occupy. Let’s think for example of a small image of 100×100 pixels, if each pixel occupies 1 byte (8 bits of color depth), then our image in raw format will occupy 100×100=10,000 bytes = 9.76 KBi. But if instead of 8 bits, we have 24 bits, each pixel of our image will occupy 3 bytes and therefore the entire image will occupy three times as much, 30,000 bytes = 29.29 KBi.
Now that we have seen some of the basic concepts, let’s look at the different formats in which we can save our images and which one we should use at any given moment. It doesn’t matter if you use Gimp, Adobe Photoshop, Adobe Lightroom or Corel Photopaint, everything I’m going to explain is applicable to any photo retouching program you use.
JPG (Joint Photographic Experts Group)
JPG is a lossy 24-bit color compression format. It does not support animations or transparencies. It is the ideal format for photographs, in color or black and white, especially if they have a wide variety of shades.
When saving such an image, the quality level should be set between 0 and 100%. The higher this value is set, the larger the image will be and the less the loss of quality will be noticeable. Normally, between 70% and 80% we will not see any difference between the compressed image and the original, since the compression applied is based on statistical studies of human vision. In some programs, you can choose to subsample the color of the image. We will select the subsampling option that reduces the size the most and this will be the 4:2:0 or 2×2 1×1 1×1 option. With this we will reduce the color information contained in the image and we will not notice any difference. If the image is in black and white, all color information can be removed with 4:0:0, but this is usually done automatically by the programs.
If you are interested in the subject, in an article on my personal blog I explain the JPG compression algorithm and the meaning of subsampling in more detail.
PNG-24 (Portable Network Graphics)
32-bit lossless compression format. Of those 32 bits, 24 are used to represent the colors and 8 to make transparencies with different levels of opacity in each pixel. Animation is not supported. If we use it without transparency it will use only the 24 bits indicated in the name.
This format should only be used when it is really necessary to use images with transparencies. If the background behind the image is not going to be displaced or the same image is not going to be used with another background, it is preferable to paste the one you are going to have on the Web and save the image in another format, since using a higher number of bits per pixel and using compression without loss of information, this format takes up the most space of all.
In some programs we can adjust the compression level between 0 and 9, being 9 the value that will occupy less space and the one we should always choose, since the image will not lose quality, regardless of the compression value it has.
PNG-8
Like PNG-24, it uses the same lossless compression algorithm, but with a color depth of 8 bits. It supports transparency, but not with different opacity levels, so if the transparent area has rounded edges, it will give a saw-tooth effect (although it is actually the photo retouching tools that do not allow saving with different opacity levels, the format does). Animation is also not supported.
Image formats with 8-bit color depth are also called 8-bit palette or indexed color. This is because each of the 256 colors is associated, in an index, to one of the 16,777,216 colors that can be represented with 24 bits. Therefore, we have a limited palette of 256 colors, which have been previously chosen from the 16 million available.
This is the ideal format for drawings, icons, logos, designs and in general any image with few colors. Preferably we will use PNG-8 rather than JPG for this type of graphicsIf we use JPG we will notice the effects of the lossy compression applied by this algorithm, since it will seem that a kind of perceptual blur has been applied to the result, and this is much more noticeable in a design with well-defined edges than in a photograph. In addition, with JPG we will not get a compression level as high as PNG for this type of images, since it compresses better in situations where the same color is repeated several times.

If the image has more than 256 colors we can also save it in PNG-8, but we must reduce the colors beforehand. The program will give us the choice of a screening technique. Each will differently distribute pixels of one color around pixels of another color to give the appearance of an intermediate color between the two. Screening, although it requires some loss of information, allows this format to be used with images that go a little over 256 colors, without much loss of information.
If the image has less than 256 colors or we want to reduce the number of colors so that it takes up less space, we can specify this to the program. Thus, we can have images with the following relationships between number of bits and colors: 1 bit = 2 colors, 2 bits = 4 colors, 3 bits = 8 colors, 4 bits = 16 colors, 5 bits = 32 colors, 6 bits = 64 colors and 7 bits = 128 colors.
The biggest problem with PNG-8 and PNG-24 is that the gamma correction applied to the colors prevents us from creating images so that in all browsers they have the same colors as other elements of the Web.
GIF (Graphics Interchange Format)
GIF, like PNG-8, is 8-bit, lossless and allows transparencies without different levels of opacity. Unlike PNG, no gamma correction is applied to the colors. Its main feature is that it is the only format supported by all browsers that allows the use of animations.
This format should be used like PNG-8 for graphics with few colors, but only when the images are only a few pixels or we want to maintain the chromatic relationship with other colors on the Web. For all other cases, PNG-8 is better because it gets smaller file sizes. This format was widely used in the early days of the Web to put animations. As an interesting anecdote, its inventors used an algorithm that had a patent without knowing it, which caused that from 1994 to 2004 you had to pay a license fee to put GIF files on your Web and this generated a campaign against this format called burn all gifs.
WEBP
This format has been created by Google to replace all others. The problem is that it is only compatible with Chrome and Opera browsers, plus there are few tools to manage it. It is 24-bit, can be used lossy or lossless, can support transparencies with different opacity levels and animations. The only thing it does not support is 8-bit indexed color, so it beats JPG in photo quality and compression, but in graphics images with few colors PNG-8 still beats it.
Its use is discouraged in any case because of its poor support.
Finally, some general recommendations
- Never save the images at a larger size than the hole where they will be displayed.
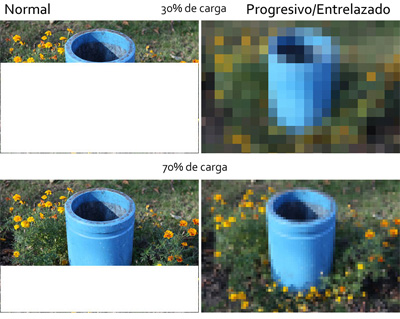
- Always save images in progressive mode if it is a JPG and in interlaced mode if it is a GIF or PNG. This option causes the entire image to be displayed with a low resolution version that will increase in detail, instead of appearing bit by bit or line by line. This will slightly increase the size of the file, but will the user will perceive that the image is loaded sooner and every good computer engineer knows that, in any given user interface, perceived speed is always more important than actual speedSo we have progress bars that create the effect that tasks take less time, when in fact they cause them to take a little longer.

- In the text fields provided by the formats for storing meta information, do not store anything and remove them if possible. These are data that do not contribute anything, such as the date of creation or EXIF data of the parameters of the camera that took the photograph. On the other hand, it is advisable to fill in the comment fields with keywords describing the image, as the Google image search engine spider is able to read them.
- Write image names as friendly URLs, i.e., without accents and hyphens and with hyphens instead of spaces.
- Always write an alternative text when inserting an image in the HTML (“alt” attribute).
So far my recommendations. If you have any doubts, the best thing to do is to try saving the image in several formats and choose the one that takes up the least space and looks the best.