Written by Aurora Maciá
Index
Whether you are one of those who have never tried uploading a Story or you are one of those who post all your salads, this guide will uncover something new you didn’t know about Instagram stories and show you why they are important when deciding what image we want to give of our brand. This is a long post, yes, but I’m sure that, once you read it, your Stories will become the most original of the social network.
We’ll start by going over all the basic features and functions of Instagram Stories, from its format to where they are archived, so that no one gets lost among so many icons.
Once we are clear about these instructions for use, we can get creative and share Stories that encourage engagement with our audience, either by their aesthetics or by their call for interaction. Filters, external applications, stickers, gifs, typographies… If we want to connect with our audience and have a powerful brand image, it is worth spending a little time even on something as ephemeral as a Story.
On August 2, 2016, Instagram launched Instagram Stories (or Historias de Instagram in Spanish), a functionality added to the original app that copied the format until then exclusive to Snapchat: images or videos that last only 24 hours and, later, disappear. This premise, at first seemingly simple, has become increasingly complicated: since its launch, the possibilities for interaction and personalization of Stories have grown with each new update of the social network.
Level 1: Beginner? Start here
What is an Instagram Story?
An Instagram Story is an image or video that we share on our Instagram profile and disappears after 24 hours from our followers’ view. However, Instagram has already taken care to invalidate this definition with some of its latest updates, as we will see below. For now, we just need to know that if we do not take any action after publishing our Story, it will disappear one day later.
How long does a Story last?
A Story lasts 15 seconds by default, and, unlike Snapchat, where it was possible to choose whether we wanted our photo to be displayed for 3, 5 or 10 seconds, we cannot change this duration when uploading an image. If it is a video, the Story will last as long as the video lasts, even if it is less than 15 seconds. If the video is longer than 15 seconds, Instagram will automatically cut it into two or more Stories.
What is the format of a Story?
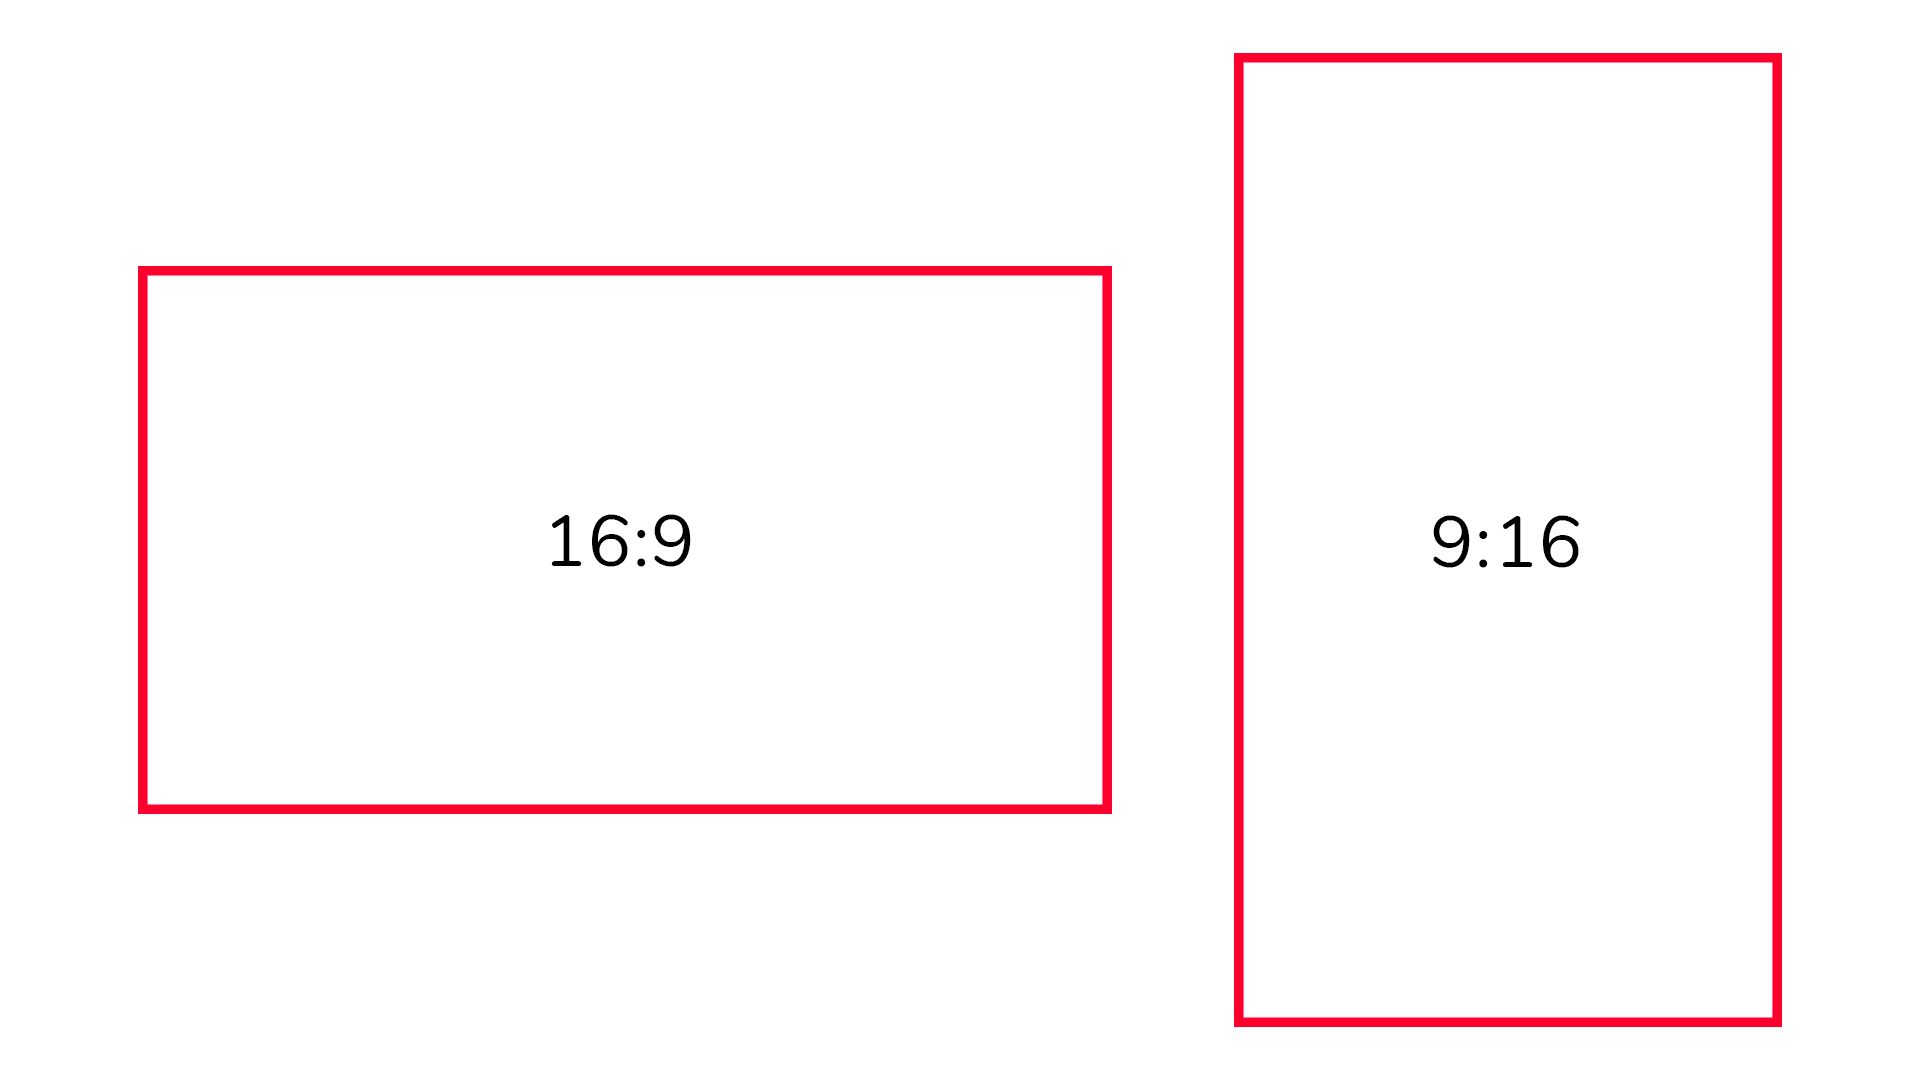
The format of a Story is 9:16, i.e. the opposite of the classic 16:9 used in horizontal videos. The recommended resolution of our Story should be 1080×1920 pixels for maximum quality, but we can also use lower resolutions such as 720×1280 pixels without problems.
Practically anything we want. A photograph, an infographic, a video, a gif… it doesn’t all have to be selfies! In general, it is used in a more informal way than the publication in the feed, where the photographs remain and often we try to maintain a certain aesthetic that marks our profile over time.
In Stories, photos are usually taken with the cell phone itself and have a more sloppy or amateurish look. However, if Instagram is a useful and important tool for our brand, we can invest more time in creating them and give them a more elaborate and polished look. It all depends on what we want to convey: closeness or professionalism.
Who can see our Stories?
Everyone who accesses our profile even if they do not have an Instagram account (or only those who follow us if we have a private account) will be able to see our Stories unless we hide them.
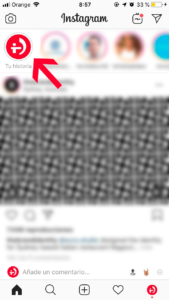
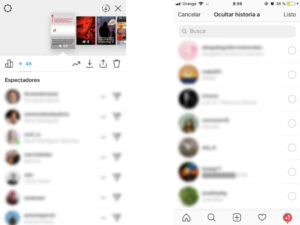
We can see who has seen our Stories by tapping on the bottom left corner, where it will show the profile picture of one of our followers and a “Seen by X”, or by swiping up. A list of all the people who have viewed our Story will appear and, if we have a Facebook page linked to our Instagram account, we will also be able to see some more data that we explain below.
If we want to hide our Stories from someone, we can tap the three dots icon next to their name when they appear in this list and the option “Hide story from X” will appear. Alternatively, we can go to Settings, located in the drop-down menu of the right when entering our profile, > Privacy > Story > Hide story to, and we will get a list of all our followers from which we can choose who we do not want to see our Stories (but they will still be able to see our feed).
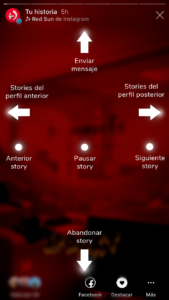
- Tap on the left side of the screen: Previous Story
- Tap on the right side of the screen: Next Story
- Press and hold: Pause Story
- Swipe down: Quit Story (and therefore exit from the Stories stream to the normal feed )
- Swipe to the left: Switch to the Story of the previous profile
- Swiping to the right: Switch to the Story of the rear profile
- Swipe up: Option to send a message to the user who posted the Story.
Level 2: If you are an amateur, make sure you have this under control
Shooting modes
Once we enter the Stories interface, we have different options that we can change by swiping left and right at the bottom of the screen:
- Live: if we want to transmit a “live” video, this is our option. All our followers will be able to see it (also whoever visits our profile if our account is public) and there is even an option to send us questions that we will be able to answer live. You can also comment on what you want and everyone who “attends” our live video will see it. If we want the followers who have not been able to connect when we were broadcasting to see the video later, we have the option to save it to keep it available for 24 hours.
- Create (old Text): this mode gives priority to the text over the image. In this mode, we can choose between the different fonts of the application (Typewriter, Strong, Modern, Neon) and different colored backgrounds. Once we finish writing our message, we can “save” it and add gifs, emoticons and the rest of the decorations we normally see.
- Normal: this is the most commonly used shooting mode. We have the option to take a picture (press the round button) or a video (press and hold the same button as long as desired) at that moment, or choose them from our cell phone reel. We can also select whether we want the Flash to pop up and switch the mobile camera from internal to external and vice versa. Finally, we can try on the augmented reality Instagram filters. These filters, deliberately copied from those offered by the defeated Snapchat, are now innumerable as users themselves can create and upload them. With them we can, for example, give an analog look to our image, completely change our facial features as if we had undergone a cosmetic operation or dress up as a Halloween costume.
- Boomerang: This option allows us to create a gif with our camera, that is, a video of a few seconds that repeats in a loop.
- Superzoom: this mode looks a lot like the normal mode until we see what happens if we zoom in (i.e. if we slide up on the screen while holding down). Hearts, flames, camera flashes… In general, this mode will give a very comic or theatrical effect to the video we create.
- Hands-free: most useful if we want to gesture while recording a video or want to avoid that arm extended towards the phone so characteristic of selfies. We can let go of our phone: Instagram will take the photo for us.
Customization options
We already have our photo, video or text. And now, what do we do? The time has come to customize it (even more).
- Filters: yes, we can also use augmented reality filters a posteriori, but we will no longer have available those created by other users, only a few offered by Instagram. We can also apply normal filters to the whole image by sliding left and right.
- Paid collaboration with: If we are an influencer, we can tag the business partner who paid us to create a particular piece of content to clarify the commercial nature of the post. We also have the option to allow our business partner to promote our content, turning the tagged story into an advertisement.
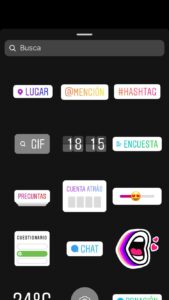
- Stickers: watch out, this is where we can get a little overboard. We can create a sticker with our location, write a hashtag, include the time or even the temperature. We can also choose from the dozens of emojis present on our phone, the thousands of Giphy gifs and Instagram stickers. However, the most interesting options for their invitation to interaction are the following:

- Mention: if we mention another user, they will receive a notification and will be able to share our Story in their story or reply to us with a private message. If we are not mentioned, the only way to share someone else’s Instagram story will be to take a screenshot and upload it.
- Poll: in this option, we have the possibility to launch a question to our followers and allow them to choose between two options (by default “Yes” and “No”, but we can change them to whatever we want). Will the user who created the poll be able to see who voted for each option? Indeed, once we launch the poll, Instagram will inform us who has voted for each option and what is the answer.preferred in the form of percentages.
- Questions: this feature also allows you to ask a question, but this time the answer will be open, i.e. our followers will write whatever they want as an answer on the sticker itself. Later, we can either share their answers publicly without the rest of our followers being able to see which users have written them or reply to them privately.
- Countdown: do we have an upcoming event that involves more people? Let’s create a countdown so that those interested in the event can follow it and Instagram will remind them how much time is left.
- Meter (swipe meter): Our followers will be able to swipe the emoji we choose on a bar to indicate their reaction to our content.
- Quiz: If we want to test our audience (by proposing, for example, a fun quiz), this is the best option. We will be able to create a question and up to four answers, indicating which one is correct and which ones are wrong. There are users who, given the impossibility of carrying out surveys with more than two options, use this tool to do so. However, we must be careful and warn in advance that the answer marked in green should not be interpreted as the correct one. Otherwise, our audience will surely believe that our brand defends that option.
- Chat: we can invite our followers or anyone viewing the Story to join a group chat.
- Donation: allows you to invite your audience to donate money to a certain association of your choice.
- Brush: We can choose between painting with a brush, a semi-transparent marker, a pencil with a neon effect or erase, as well as the size and color with which to paint. The colors are not restricted to those we see at the bottom of the screen: we can choose any other by holding down on a color, which will display the full spectrum of colors. We can also select any color present in the image that we have taken with the eyedropper.
- Text: finally, we can choose from the five fonts offered by Instagram (modern, neon, typewriter, strong and classic) and add a message to our image.
Share
We already have our Story ready to see the light, what options do we have to share it?
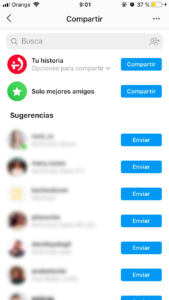
- Our Story: anyone who follows us will be able to see our Story if we put it in our history, except those to whom we have hidden it.
- Send to: if we only want certain people to see our Story, with this menu we can choose them from among all our followers.
- Best friends: Instagram now allows us to create a smaller group within our followers and show certain Stories only to them. This group, as its name suggests, is usually reserved for people you trust. We can choose these people by accessing from the drop-down menu on the right of our profile to the “Best Friends” tab, where we can select them from the list of our followers. Stories shared with the “Best Friends” group will appear with a green circle (instead of the characteristic pink circle) and with a label in the top left corner of the Story, so even though Instagram will not notify the user that we have added them to our list, they will be able to see that they are among our “Best Friends”.
In the chats part of Instagram, which we access by clicking on the paper airplane icon, we can also create WhatsApp-style groups that Instagram will later suggest above the rest of our followers to send our Stories. In fact, many people use these chats in a very similar way to how WhatsApp is used, exchanging both messages and photos.
Save our Story
Featured stories
If our Story has turned out too well for it to disappear 24 hours later, we can always save it in Featured Stories. Featured Stories are collections of Stories that will always be visible on our profile, which can be accessed by clicking on the circles below our biography. These compilations are are usually grouped by subject with a title and a cover page. We will see how to customize them later.
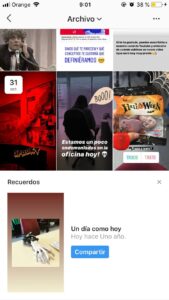
Archive
In this section, Instagram saves all our Stories in case we want to share them again at some point. It also generates “Memories”: it rescues Stories that we published that same day one, two or x years ago. This file can be very useful to include in Featured Stories the content we want a posteriori without worrying about saving it in time before it vanishes.
Level 3: Experts, here are some tricks!
It’s time to get creative. The customization options offered by Instagram are practically infinite, but we will try to summarize the main or most effective ones. In a world so oversaturated with content and information, being more original than the rest is key to being remembered. Likewise, the pace of navigation on social networks is vertiginous: printing our brand identity on everything we create will help the user to recognize us more easily and quickly. Choosing two or three colors with which to associate our brand, for example, can be vital to characterize our Stories.
10 creative tricks for Instagram Stories
Here are 10 ideas to make your Instagram stories more original and creative.
1. Fill with color
If you select one of the brushes and hold down anywhere on the screen for a moment, the color you have selected will fill the entire screen. If we do it with the marker, the photo will still be visible because it is semitransparent, but if we do it with the brush, we will obtain a solid color. This action is still possible even when we share a post from someone else’s or our own feed and will almost always look better than the blurred background that Instagram offers by default. We can also play with layers by taking a photo, covering it with color and using the eraser to create “masks”.

2. Paint and erase
We can create doodles that play with our images by simulating layers, blurring the strokes in certain parts to make it look like the image is on top. We will see it more clearly with these images:

3. Collage

Let’s transform our Story into a collage by copying a photo from our camera roll and pasting it into the Story by pressing and holding until the “Paste” option appears or, if we go directly from “Photos” to Instagram”, it will probably suggest it directly with the “Add Sticker” option.
In this way, we can add multiple images to the same Story. Once we have our collage, we can try with the brush and create frames for our photos.
4. Playing with typographies
And not only with typographies, but we can also mix them with our calligraphy. This will result in more dynamic and aesthetic Stories, especially if we squeeze the tool and combine texts with background with texts without it, different sizes, colors…
We can even paint a background manually for our text instead of using the automatic one!
5. Create a rainbow effect in the text
This effect is a little more complicated to achieve. We have to write our text, select it from beginning to end and hold down the color where we want the rainbow to start until the chromatic spectrum appears. Once it appears, while holding down, we will have to move one finger across the chromatic spectrum while the other is deselecting letter by letter the written text. The selected text will change color and when a letter is out of the selection, it will adopt the color in which our finger was at that moment and it will not change.
To make it clearer, let’s watch this short video:
6. Covers for Featured Stories
If we want our profile to be aesthetic from top to bottom, it is advisable to create covers for our Featured Stories that do not clash with the colors chosen for our feed and that give some information on the theme of each compilation.
A good way to do this is to choose icons that represent each theme and place them over a solid color that is present in our brand identity.

7. Design with external tools
If we have time and we really want to differentiate ourselves from the rest of the Stories, we can design them with Illustrator, Photoshop or even After Effects. Using typographies different from those offered by Instagram or dynamic animations will capture the user’s attention and will imprint professionalism in our content. However, if we make it too elaborate, it may look like an advertisement and generate more rejection to the user.
8. Editing with external applications
The applications that allow us to edit Stories for Instagram are endless. Here are some of the most commonly used ones:
- Unfold: although the free options are quite limited, this application allows us to create clean collages and decorate them with beautiful stickers and texts with more formal typographies.
- Meitu: this application offers a large number of filters and frames for your photos. For example, you can transform them into a Polaroid photo or apply other vintage frames and effects.
- Lightroom for mobile: if we are used to using photo retouching tools on our computer such as Lightroom or Photoshop, Lightroom for mobile will be our best option. This professional tool will allow us to edit our photographs in detail, since it presents almost the same functionalities as the Desktop version.
9. Create templates that our audience can fill out
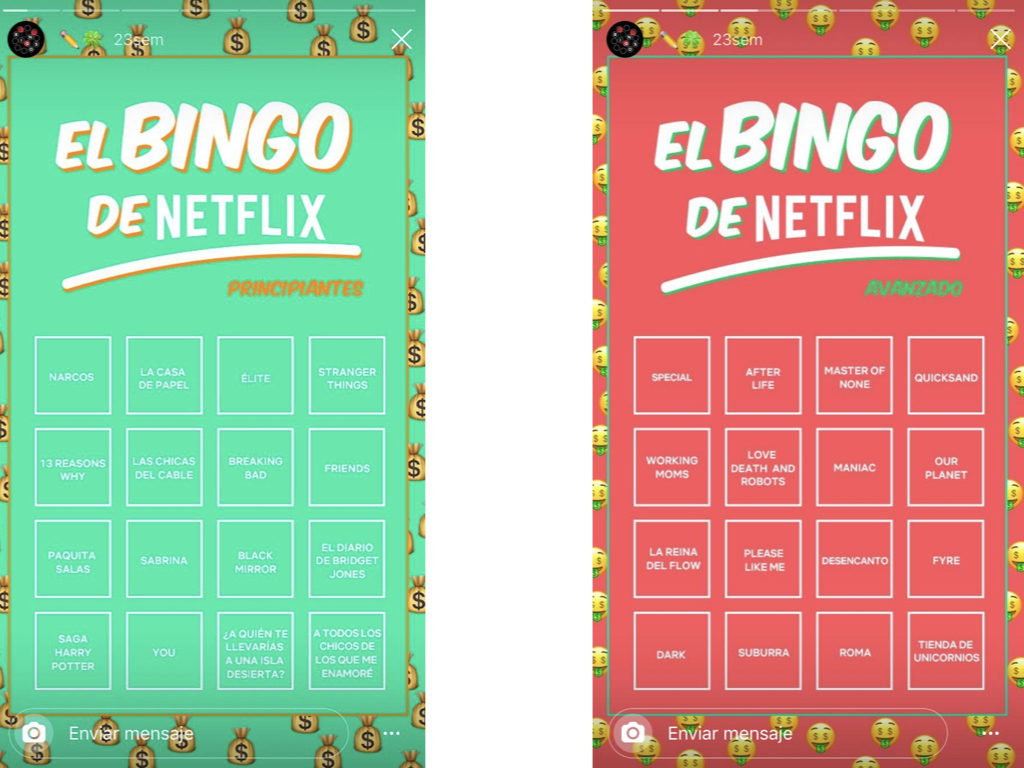
This strategy is simple and can generate a lot of engagement. We create a template with Illustrator, Photoshop or online tools such as Canva in which we ask questions and leave gaps for each user to contribute their answer (For example: “What gif represents your mood today?”).
We customize the template so that it is clear who has created it (logo, user, colors of our brand), since users who want to use it will take a screenshot of the template (logo, user, colors of our brand).screen to save the empty template on their phones and later upload it and fill it in Stories.
This strategy was employed, for example, by Netflix and its Bingos.

10. Create our own filter
If there is something that will definitely differentiate us from other users is to create our own filter. It is true that it is not a simple process, but it can be very effective and we will offer our audience something to interact with and share.
The filters are created with a tool developed by Facebook and Instagram called Spark AR Studio. Soon we will publish a post explaining how to create a filter step by step.
Something very interesting about the filters is that anyone who sees our Stories using them will be able to pick them up and try them on. If they take a photo or video with our filter and share it, the name of the filter they are using and its author will appear in the upper left corner. If many people use it, it is likely that quite a few users will be curious to see who created it and access our profile.
Statistics
If we have our Instagram profile connected to a Facebook page (anyone can do this, but it is especially useful for influencers and businesses), Instagram will allow us to view our profile Statistics. Focusing on Stories, Instagram will provide us with information not only about who has seen our stories but also what actions they have taken (if they have gone back to the previous one, if they have moved on to the next one, if they have interacted with the content…). This will allow us to measure the success of our publications and plan which strategies should be repeated and which should be abandoned.
Links
If we have more than 10,000 followers, Instagram will allow us to put a link in our stories: our audience will simply have to swipe up to access the linked content. If we don’t reach this figure, the only option left to include a link will be to paste it in our bio and announce that it is there in Stories with something like “Link in bio/link in bio”.
Actually, if we wanted to talk about all the possibilities that Instagram Stories offers us, we would probably never finish. The important thing is to analyze what our business needs and use the tools that the platform offers to achieve it. If what we want is to transmit the most human side of our brand and leave the professional side for the feed, it is better not to complicate things and record directly from the cell phone without editing the image too much. If we are looking to establish a conversation with our audience and get feedback, we will have to use surveys, questions or questionnaires. Don’t be afraid to try and see what works best for you.