

Written by Miguel Ángel Culiáñez
Index
Google Merchant is the tool that the Mountain View firm makes available to all those professionals and companies that market tangible products through the Internet, providing them with a platform specifically created to manage Google Shopping ads.
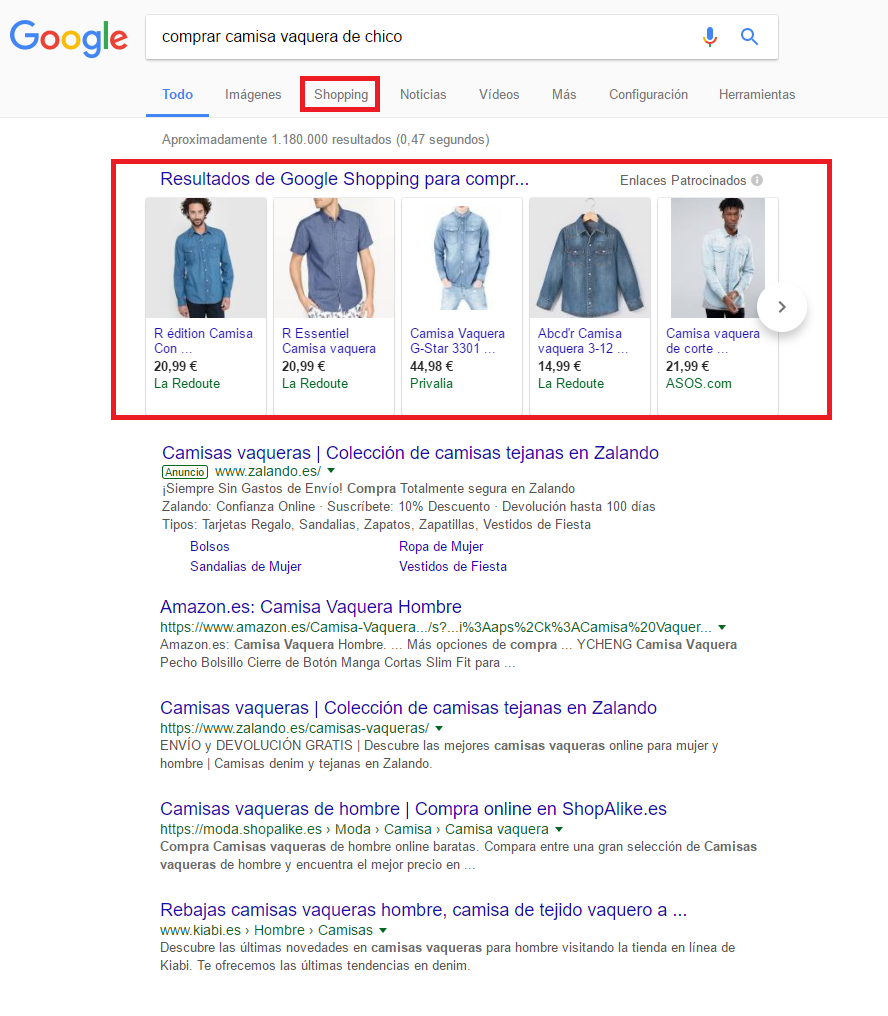
We must remember that Google Shopping ads are those that the search engine places in the results of the area with the same name (located between Images and News). However, when the search term in question entered by the user shows a clear orientation towards the purchase of a product, the search engine displays some Shopping ads among the general search results (in the tab labeled All). For example, if we were to type “buy boy’s denim shirt” in the search engine, the result would be as follows:
Next, we will explain the steps to follow to create and configure our Google Merchant account:
Step 1. Account registration through Google Merchant Center
If we access the Google Merchant Center, we can start the registration process with the Gmail account of our choice by clicking on the Sing Up button. We will have to fill in the data of our store:
- Country in which the company is located.
- Visible company name.
- Website.
- Main contact.
- Technical contact (optional). This is the person who will manage the processing of the data feed.
- Customer service contact if any (optional).
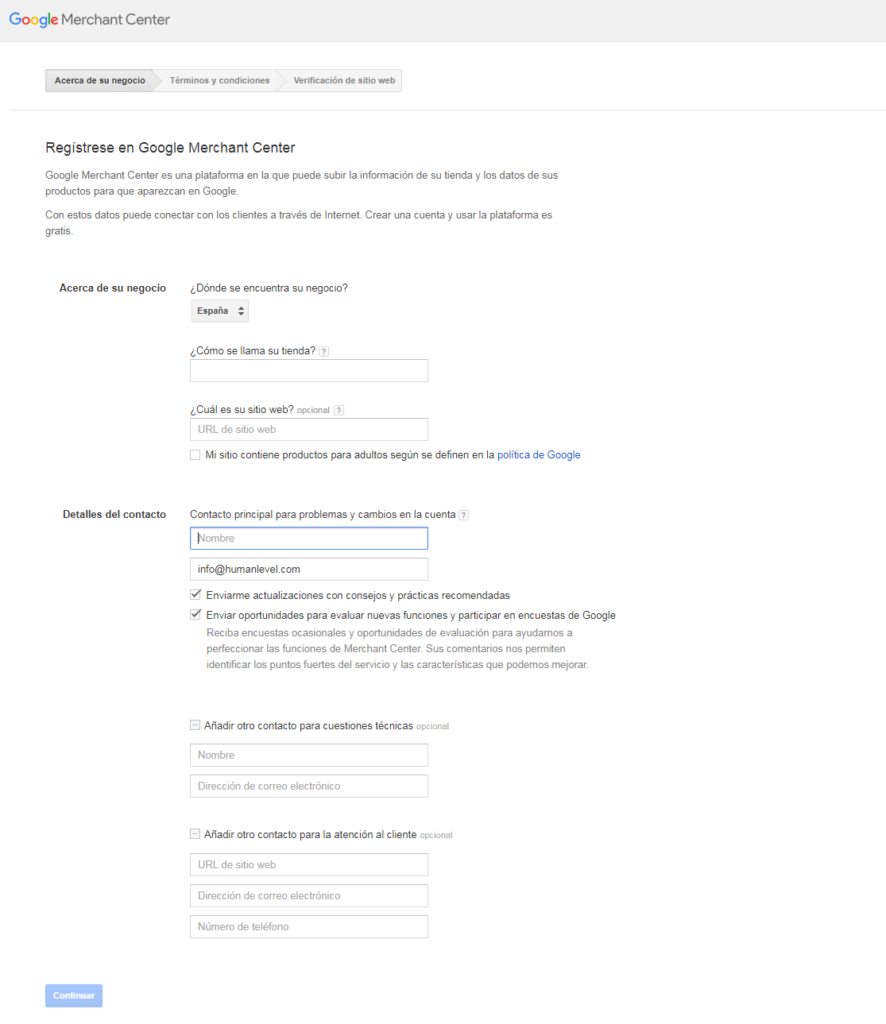
Then click on the continue button and accept the terms and conditions of the service.
Step 2. Verify and claim the online store
The next step will be to authenticate in Google’s eyes that we are indeed the legitimate owners of the online store.
The first thing to do is to verify the URL of our store. The easiest (and recommended) way to do this is to use the same Gmail account both to create our Google Search Console account and to register our Google Merchant account. This simple fact allows Google to automatically verify that we are the owners of the store.
After verification, we must move on to claiming the website. Although there are several ways to perform this action, one of the simplest is by inserting an HTML tag in the source code of our online store.
At this point in the process we must select the “Alternative methods” option , and among them, we will select HTML Tag. Then, as Google’s own instructions indicate, we must copy the meta-tag (it is a fragment of HTML code) in the section <head> of the code of our store, and more specifically, before the tag <body>.
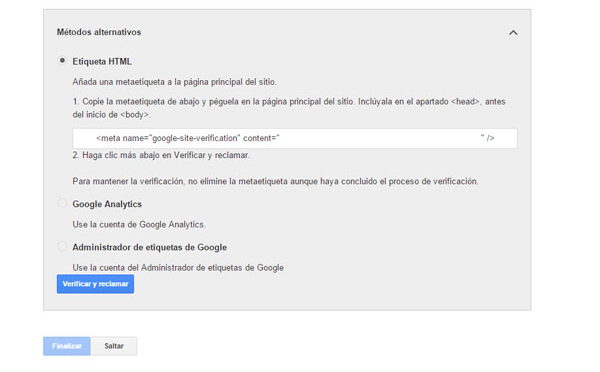
The way to insert the meta tag in the code of our store will differ depending on the CMS on which it is developed (PrestaShop, Magento, etc.). As a general rule, the vast majority of e-commerce platforms have specific locations where this meta-tag can be easily added to the code from the administration area. In the case that our store has been custom developed, it is advisable to consult with our webmaster on how to proceed to insert the tag in the code.
To learn more about all the ways available to verify your online store, visit Google’s official support site.
Step 3. Generate and upload product data file to Google Merchant Center
Once our Google Merchant Center account has been registered and our ownership of it has been verified, we must send Google the data related to the products we want to promote through Google Shopping. To do this, we will have to use what is known as a feed data.
The feed is a file containing the attributes of our articles. This data about the respective products will be used by the search engine to display and inform potential buyers about our offer.
It should be remembered that some attributes are mandatory (called main feeds ), while others are merely optional (called supplementary feeds ). Failure to complete the feed The use of data with information classified as mandatory by Google may result in the product(s) in question not being shown on Google Shopping, while omitting optional attributes may significantly reduce the chances of appearing in a more advantageous position compared to the rest of the competition. Therefore, as a general rule, it is advisable to provide Google with as much information as possible via the data feed.
To learn more about the guidelines set by the technology giant in relation to the data feed, it is recommended to see its official help site. At the same time, it is highly recommended to know what are the general policies of Google Shopping to be able to advertise products.
The file creation process with the list of products, and their respective attributes, can currently be generated very easily in most e-commerce platforms, since the main e-commerce CMS have areas or plugins within the administration panel in which you can set the configuration parameters of the feed and generate the file from the catalog of items already uploaded in our store.
Now that we are clear about what the data feed consists of and its peculiarities, it is time to delve deeper into how we transmit this information to Google. That is, how we record and upload the feed data.
In relation to this, we should keep in mind that last July 13, 2017 Google modified some elements of the Google Merchant feed area, although the operation to get all the data to Google remains intact. This is a two-stage operation:
A) Register the data feed from Google Merchant Center: this action should only be done once, as subsequent updates can be done without having to re-register the file.
From the Google Merchant Center dashboard, we must go to Products > Feeds and then click on the “more” icon. We will then be shown the section Register a new feed, from which we will have to indicate different aspects of the feed before we can complete the registration (mode, type, destination country, language, etc.). In order to have detailed information on what each field consists of, it is highly recommended to access the detailed description that Google offers from its own help area on the feed data record.
A very important aspect to take into account at this point is the need to generate a data feed file always in one of the formats supported by Google.
B) After registration, we must upload the feed. For this purpose, Google offers four upload options, one of the easiest of which is the direct upload system. That is, by loading the data file directly. However, this option only allows uploading files of less than 200 MB. Therefore, to choose one of the four options we must take into account the volume of products in our store and, consequently, the weight of the feed file to be uploaded.
Other options include uploading via FTP (File Transfer Protocol), SFTP (Secure File Transfer Protocol) and scheduled retrievals. This last option is based on sending Google a URL containing the data feed file. The vast majority of e-commerce platforms offer options to generate this URL in a very simple and fast way.
If we opt for the latter way of uploading files, we can also program the time and frequency of updates. In this way, Google will only have to crawl that URL at the set time and frequency to see and update all the information related to our product offering.
To learn more about the different options for uploading feed files, it is highly recommended to visit Google’s official instruction page.
Step 4. Linking with Google AdWords
Once we have registered and uploaded the data feed , we will have everything ready to start investing in Google Shopping campaigns, whose ads are framed and managed within the Google AdWords system.
In order for our Google AdWords account to be fed with the information we have uploaded to Google Merchant regarding our offer, we will have to link both accounts. This operation involves two simple actions in each of the accounts:
A) From the Google Merchant account, we must go to the configuration options and click on Account linking > AdWords . We must then enter the customer ID of the AdWords account we want to link. Finally, click on Add.
B) From the Google AdWords account, we must go to the configuration options, and then click on Linked Accounts > Google Merchant Center . Then click on View request > Approve.
After this, both accounts will be linked and we will be able to start investing in Google Shopping campaigns to promote our products and increase the sales of our online store.