

Index
Previously we saw
how to create custom post types in WordPress
. These types of posts are used to create specific objects for our website, such as articles for a store, users, events or any entity we can think of, each with its specific attributes (for example, a user will have a first name, last name, e-mail, etc.). Now let’s see how to present the data created with these custom posts, following the layout we prefer and choosing the data to display.
We are going to see two ways to create a page in which we list our posts customized to our taste and with the design we want. One way is to create a template and get the data using WordPress code. We will also see how to create an element with the Visual Composer plugin, so we can add as an element the list of posts itself, just as we have elements to list blog, albums or portfolio.
Upload custom posts using your own template
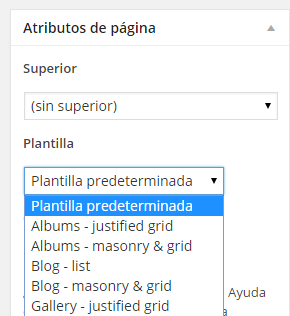
WordPress templates are used to load the content and design of the pages or blog. By default, when creating a page, the default template is used, so that what we will see will be the content as we write it in the editor. There are also templates for blog posts, which determine the design of these pages, templates that load the structure of the photo galleries, portfolios, etc. When we are creating or editing a page, we can view and change the template it is using in the Page Attributes block on the right, as shown in the following screenshot:
We are going to create our own template that will load a list of our custom posts with their attributes. Following the example of clothing store items, we are going to load a list of items with their photo, name, description, brand, price and size.
First step: create a file for our template
We create a .php file to create our template, following the model of the rest of the templates that already exist by default. From our FTP or directory where we have the code of the web, we go to \wp-content (topic name)and in this same folder we create a blank file, which for example we will call template-articles.phpand that will be together with the rest of the files of the other templates (such as single.php o page.php). To create our template is better to have a minimum knowledge of PHP and HTML, but in principle the codes that we will see will be default WordPress and we will not have to invent much, although to layout with a good design we do need some HTML and CSS. Following the style of the rest of the pages, in the first line we will indicate the name of our template, so that later we can select it from the edition of the page in WordPress, and we will add some lines necessary for the configuration and to load the header:
<?php
/*Template Name: Plantilla artículos */
if ( ! defined( 'ABSPATH' ) ) { exit; }
$config = Presscore_Config::get_instance();
presscore_config_base_init();
get_header();
//Creamos los parámetros necesarios para cargar posts de tipo 'articulo', que estén publicados (publish), que se ordenen por fecha y que muestren 8 elementos por página
$blog_args = array(
   'post_type' => 'articulo',
   'post_status' => 'publish',
   'orderby' => 'date',
   'posts_per_page' => 8,
);
//Creamos una query de WordPress con los argumentos de antes
$blog_query = new WP_Query($blog_args);
//Comprobamos si existen elementos de tipo artículo según la consulta anterior
if ($blog_query->have_posts())
{
   //En caso de haber, recorremos el listado mientras queden artículos
   while( $blog_query->have_posts())
   {
      // Obtenemos el artículo en sí
      $blog_query->the_post();

      // Obtenemos los atributos personalizados del artículo
      // Los cuatro primeros atributos serán el identificador, título, contenido e imagen destacada, cuyo código es común para cualquier tipo de post en WordPress:
      $id = get_the_id();
      $nombre = get_the_title();
      $descripcion = get_the_content();
      $imagen = get_the_post_thumbnail($id, array(200, 200)); // Elegimos un tamaño de 200x200 px de miniatura
      // Los siguientes atributos son los personalizados que creamos:
      $marca = get_post_meta($id, '_marca', true);
      $precio = get_post_meta($id, '_precio', true);
      $talla = get_post_meta($id, '_talla', true);

      // Ahora mostramos un bloque en HTML con cada uno de esos atributos:
?>
      <strong><?php echo $nombre; ?></strong>
      <p><?php echo $descripcion; ?></p>
      <?php echo $imagen; ?>
      <p>Marca: <?php echo $marca; ?></p>
      <p>Precio: <?php echo $precio; ?></p>
      <p>Talla: <?php echo $talla; ?></p>
      <hr/>
<?php
      // El bloque HTML anterior se repetirá para cada artículo
   }
   // Reseteamos la consulta por si más adelante queremos hacer otra distinta
   wp_reset_postdata();
}
?>
Once uploaded the file template-articles.php with the previous code, when we are writing a page we will see on the right, in the Page Attributes section, the drop-down with the templates that we saw before in the screenshot, where we can now select the option Template articles. Without having to write anything on this page, we publish it, and thanks to the template code we will see a list similar to the following, with our created articles:
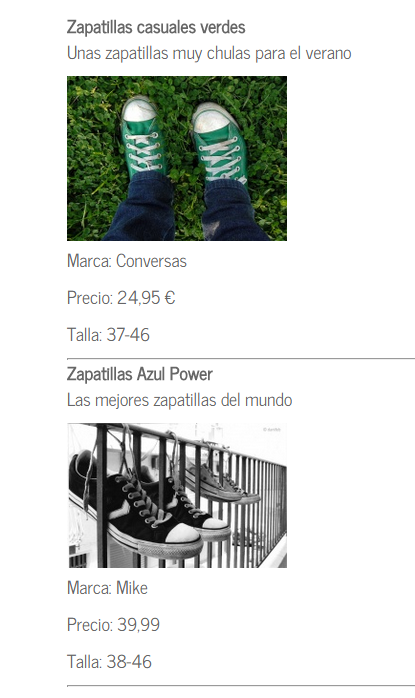
If we want to know more about the code that WordPress offers to search and list custom posts, we can consult its manual on WP Query. There is code to filter by more parameters such as name, sort in more ways, paginate results, etc. Once we have obtained the attributes as we have seen in the code, we can layout them as we wish with HTML, introducing divs, columns, borders, etc. The important thing is to know how to obtain each attribute, then we can manipulate them as we wish.
Custom plugin for Visual Composer
If we have installed the Visual Composer plugin, there is another plugin that serves as an extension to add custom elements from the Backend Editor. The unzipped folder must be uploaded to the \wp-content-plugins folder and we can go to the WordPress Plugins section to activate it. If everything has gone correctly, when we are editing a page with the Visual Composer Backend Editor, when adding a new element we will see the My Bar Shortcode example, which is the one included in the plugin we have just installed:
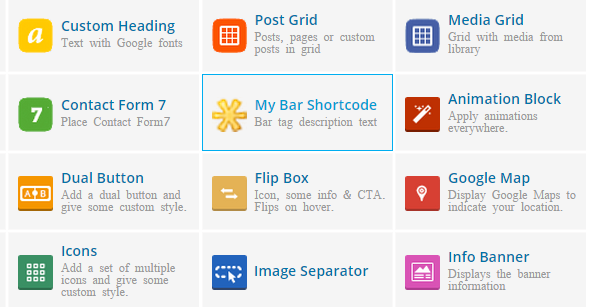
If we select that element we will see that it contains a text field, a color picker and a content text area. We would like this element to allow us to choose which type of post we want to list, as well as other interesting parameters such as the number of posts to display, the sorting criteria, the number of columns, etc. To customize this plugin we must edit the file vc_extend.php inside the folder we uploaded before. We can change the name of the plugin in the first line of the file, and if we go further down we will see two functions that interest us, one is the one that paints the editable fields in Visual Composer, and the other is the one that paints by HTML the result in our page.
Customize the layout and parameters to be collected by the plugin
The integrateWithVC() function is the one we need to modify, specifically the vc_map parameters. We see the name, description, and the parameters collected by the plugin, which for now are a textfield, a colorpicker and a textarea_html. We are going to put a textfield to put a title to our list, a section of checkboxes to select the type of post we want to filter, and another textfield where we will write the number of posts that will be shown in the list. In the following code we highlight in blue what we are interested in changing:
vc_map( array(
   "name" => __("Posts personalizados", 'vc_extend'),
   "description" => __("Muestra un listado de nuestros posts personalizados", 'vc_extend'),
   "base" => "bartag",
   "class" => "",
   "controls" => "full",
   "icon" => plugins_url('assets/asterisk_yellow.png', __FILE__), // or css class name which you can reffer in your css file later. Example: "vc_extend_my_class"
   "category" => __('Content', 'js_composer'),
   //'admin_enqueue_js' => array(plugins_url('assets/vc_extend.js', __FILE__)), // This will load js file in the VC backend editor
   //'admin_enqueue_css' => array(plugins_url('assets/vc_extend_admin.css', __FILE__)), // This will load css file in the VC backend editor
   "params" => array(
   array(
      "type" => "textfield",
      "holder" => "div",
      "class" => "",
      "heading" => __("Título", 'vc_extend'),
      "param_name" => "foo",
      "value" => __("Default params value", 'vc_extend'),
      "description" => __("Description for foo param.", 'vc_extend')
   ),
   array(
      "type" => "posttypes",
      "holder" => "div",
      "class" => "",
      "heading" => __("Tipo de post a mostrar", 'vc_extend'),
      "param_name" => "tipo_post",
      "description" => __("Selecciona el tipo de post que se mostrará", 'vc_extend')
   ),
   array(
      "type" => "textfield",
      "holder" => "div",
      "class" => "",
      "heading" => __("Número de elementos", 'vc_extend'),
      "param_name" => "num_posts",
      "value" => __("6", 'vc_extend'),
      "description" => __("Escribe el número de posts que se mostrarán en la lista", 'vc_extend')
   ),
 )
 ) );
With that code for vc_map, our plugin would look like this when we click on the yellow asterisk icon we saw before:

We can change or delete the title, select the types of posts recognized by WordPress on our website to display, and the number of posts to display.
Get parameter values and display list
Once the parameters of title, posts to display and number of elements have been chosen, these parameters must be collected and the content must be displayed in HTML. This plugin does it in its renderMyBartag() function. If you look at the example, they have the parameters foo and color. Then there is the variable $output, which contains the HTML code that will be finally displayed, with the parameters in the middle in the format ${parametro}. What we can do here is copy the part of the code we put in the template, with WP_Query and its arguments, the while loop, etc. And where were the parameters of the type of post and number of posts to show, we would put the following:
$blog_args = array(
   'post_type' => ${tipo_post},
   'post_status' => 'publish',
   'orderby' => 'date',
   'posts_per_page' => ${num_posts},
);
Where tipo_post will contain the type of post that before we put as article, and num_posts will be the number that we put in the plugin, instead of the 8 that we had before. From here we can continue with the same code of the loop containing the obtained posts, or give them the HTML format we want. We can also add more parameters to the plugin in several ways, as we can see in its manual. Once we have everything, when we publish the page where we put this element of the plugin, the list will be displayed in the section where we put that element, being able to coexist with other elements that we have put in the content of the page.
So we have seen two ways to display our custom posts, either by creating specific templates for our listing page, or by adding elements to the Visual Composer plugin to be able to select more conveniently in the editor interface with the parameters we want. The key in both cases is to obtain the attributes of the posts (title, content, image, etc.), and once obtained these attributes and other optional parameters such as the type of post to display or the quantity, play with them to design our page to our liking.