

In this article we are going to see how to create custom post types in WordPress. There are several types of posts(post types), such as pages and blog posts (page and post). But we may be interested in creating other custom types. Let’s imagine that our website is a clothing store, and we would like to have pages for each of the items we sell to display them on the web, with their main attributes: photo, name, description, price, brand… Although we can do this by creating a page or post and adding the content we want to show for that article, in the long run it is more convenient to create a custom type of post which we will call for example ArticleWe will add the attributes of that item, and we will present it with the format we want.
To create custom post types we can do it in several ways. WordPress offers code to insert in our functions.php file included in the folder of the theme we are using, but we are going to use a plugin for convenience that will make things easier. The plugin in question is called Custom Post Type UI, so we can download it from their website and upload it to our FTP, or search for it from the Plugins menu in the WordPress administration desktop. Once installed and activated we can work with custom post types:
Create new post type
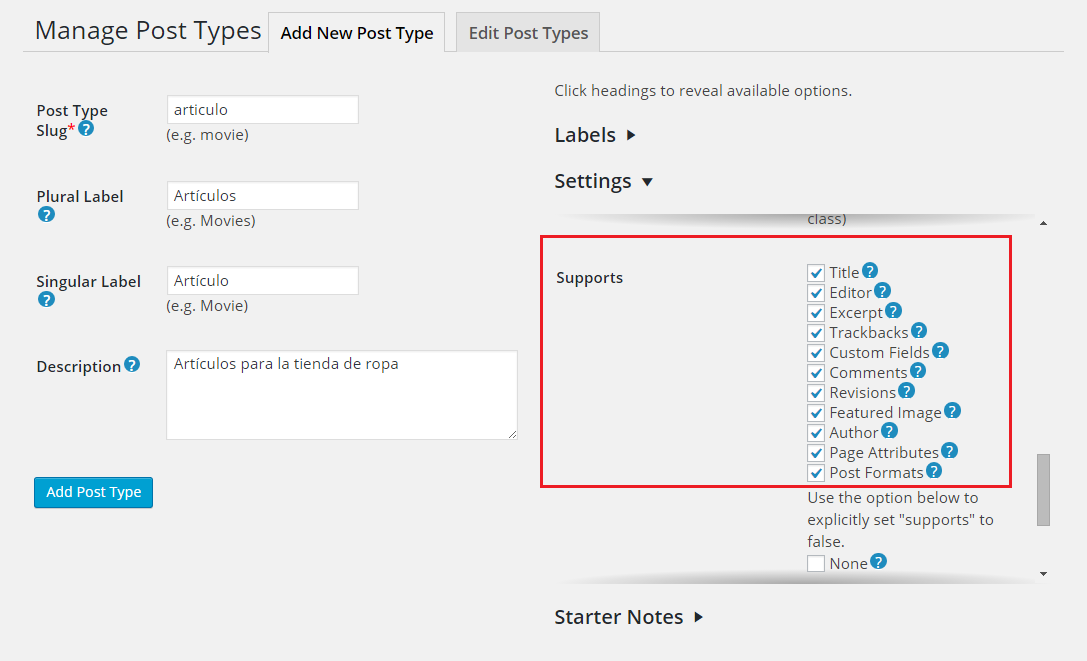
We look for the newly installed plugin in the WordPress menu, called CPT UI, and click on Add/Edit Post Types in that same menu. In this menu view we will see the tabs for adding and editing post types. In Add New Post Type, type the name of the type of post we are going to create. On the one hand, we must specify the slug, which will be the name we will see in the URL for that type of post, and which ideally will only have letters and hyphens (no accents or other symbols). In our case we have set the slug article, the plural noun Articles and the singular noun Article, which will be the name of this type of post. On the right we can edit the tags (Labels) that we will see when we create our Item type, for example in Menu Name we can put Items, in All Items All items, in Add New New…. And on the other hand, we have the section Settingsin which we can specify settings for our type of post. In principle it would be enough to check the options of Supportsso that we can add a title, custom fields, author, featured image, etc.… but leaving the option None unchecked, and the rest of the options as they were by default. In the following screenshot we can see an example of how it would look like:
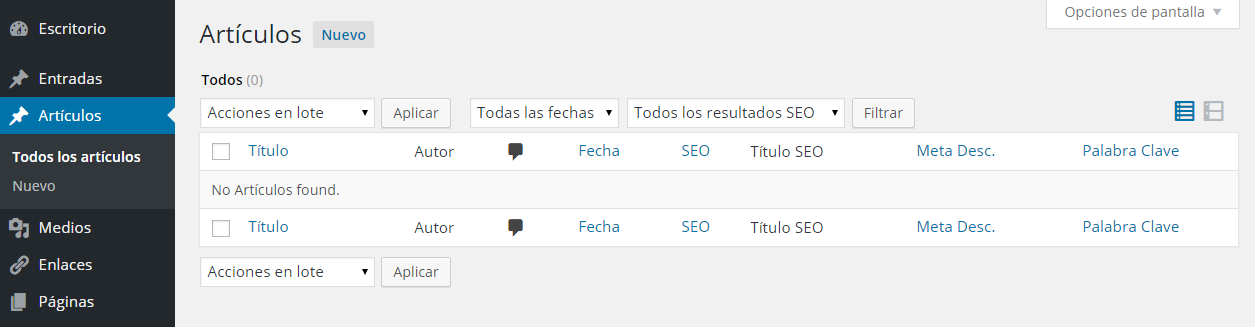
When we finish we click on Add Post Type and we will see in the left menu the option Articles (according to our example), next to Pages, Posts and other options of our menu. If we do not see it we may need to refresh the page.
Create objects with custom attributes
Now that we have created our post Article type, let’s create objects of that type. To do this we will do the same as we created pages or entries, but this time from the Articles option. We will see the same page as for the creation of posts with the list of articles we have, which in principle will be empty. Internally these articles are posts for WordPress, but of article type(the post_type that WordPress saves is the same as the slug we put, and we should not change it once created).
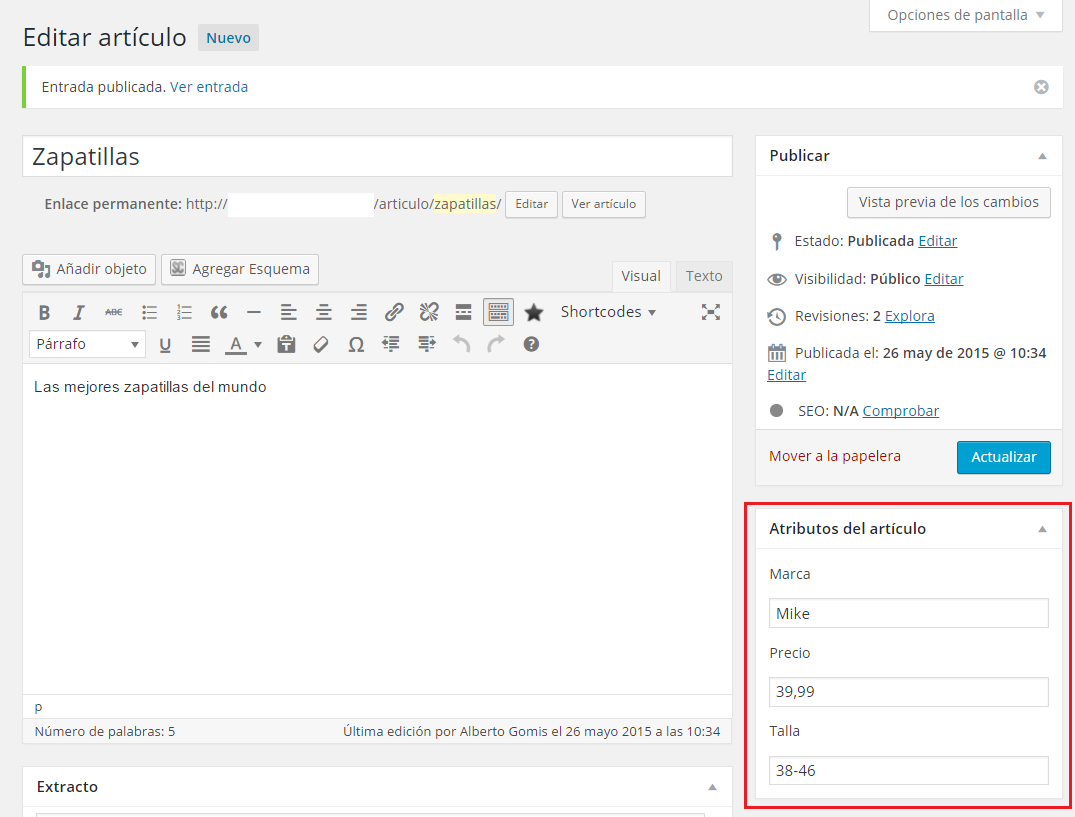
So what’s the point of creating custom post types if we can use normal posts? First of all, it is more convenient to differentiate between different entities that we want to have on our website, to manage and present them separately. And secondly, we can add custom attributes to these post types, which will not affect blog posts or other types. For our Item example, we are going to add the attributes Name, Description, Image, Brand, Price and Size. For convenience, the name will be the title of the article, the description will be the content we write in the article, and the photo will be the featured image. The rest of the custom attributes we will add in metaboxes, which are the content boxes that we can add to pages and posts in WordPress.
To add metaboxes and custom attributes to our articles, we can do so by adding the following code to our functions.php file included in our theme folder. We discuss each function in the code itself:
// Añade el metabox para los artículos en el lateral de la pantalla
function add_articulos_metaboxes()
{
   // ID metabox, título metabox, función que muestra los atributos, tipo de post, zona metabox, prioridad
   add_meta_box('articulos', 'Atributos del artículo', 'articulo', 'articulo', 'side', 'default');
}

// Acción que llama a la función que añade el metabox para los artículos
add_action( 'add_meta_boxes', 'add_articulos_metaboxes' );

// Función que muestra los atributos del artículo
function articulo()
{
   global $post;

   // Noncename necesario para verificar de dónde vienen los datos
   echo '<input type="hidden" name="articulometa_noncename" id="articulometa_noncename" value="' .
   wp_create_nonce( plugin_basename(__FILE__) ) . '" />';

   // Obtenemos los atributos del artículo si estuvieran guardados, con get_post_meta y el nombre del atributo
   $marca = get_post_meta($post->ID, '_marca', true);
   $precio = get_post_meta($post->ID, '_precio', true);
   $talla = get_post_meta($post->ID, '_talla', true);

   // Mostramos los campos de texto donde introduciremos los atributos
   echo '<p>Marca</p>';
   echo '<input type="text" name="_marca" value="' . $marca . '" class="widefat" />';
   echo '<p>Precio</p>';
   echo '<input type="text" name="_precio" value="' . $precio . '" class="widefat" />';
   echo '<p>Talla</p>';
   echo '<input type="text" name="_talla" value="' . $talla . '" class="widefat" />';
}

// Guarda los campos personalizados
function save_articulos_meta($post_id, $post)
{
   // Comprobación de seguridad para que no se acceda desde otros sitios
   if ( !wp_verify_nonce( $_POST['articulometa_noncename'], plugin_basename(__FILE__) )) {
      return $post->ID;
   }

   // Comprobación de que el usuario actual puede editar
   if ( !current_user_can( 'edit_post', $post->ID ))
      return $post->ID;

   // Obtenemos los atributos guardados en POST cuando guardamos nuestra página de artículo
   $articulos_meta['_marca'] = $_POST['_marca'];
   $articulos_meta['_precio'] = $_POST['_precio'];
   $articulos_meta['_talla'] = $_POST['_talla'];

   // Guardamos los valores de los atributos como campos personalizados
   foreach ($articulos_meta as $key => $value)
   {
      if( $post->post_type == 'revision' ) return; // No guardamos si el post es una revisión
      if(get_post_meta($post->ID, $key, FALSE))
      {
         // Si el atributo ya existía, lo actualizamos
         update_post_meta($post->ID, $key, $value);
      }
      else
      {
         // Si no existía, lo añadimos nuevo
         add_post_meta($post->ID, $key, $value);
      }

      // Si el valor está en blanco, eliminamos el atributo
      if(!$value) delete_post_meta($post->ID, $key);
   }
}

// Llamamos a guardar los atributos cuando guardemos el artículo
add_action('save_post', 'save_articulos_meta', 1, 2);
Once this code is added to the functions.php file, when we go to add or edit an article, we will see the box (metabox) with the attributes that we have created in the code. We can write the values we want and they will be saved when we publish or update the article.
If we would like to create other types of posts, we create them with the CPT UI plugin, and to add attributes to them we can copy the code above and add it to functions.php as many times as we have custom posts, changing the article name to the name of the post we are creatingand adding the attributes we want. Moreover, we can add those attributes not only with the HTML input tag, but also with selects, checkboxes, etc. Now that we know how to create custom post types and add attributes to them, to get those attributes we would do it with the code get_post_meta($post->ID, ‘_attribute’, true); where $post->ID is the ID of the object in question and _attribute the name of the attribute we want to get.
In the next blog post we will see how to obtain and present custom post data in the format we want.